Pages

Sunday, August 30, 2009

Baby and Bag Brag!

Pics I took last night of the big/little guy. He stayed with G'Mum while Mummy & Daddy went to a birthday party.

He was good as gold, he's trying to "talk" & works very hard at vocalizing!


So sweet these little ones are, so pure & innocent, as yet untouched by the world.
What a gift.

My other brag- I bought a new purse!
We women understand how looking for a new pocket book is about as difficult as finding, well-nice fitting jeans!
It must be big enough-but not too big- have the requisite number of zippered pockets to keep my stuff safe & separated, the right handle-one not two for me, nice & wide & soft on my shoulder.
Then it has to be cute- if there's no chemistry there's no purchase! If I am to live with this appendage I cannot possibly be seen every day with something less than cute!
I was checking out " Rocking P" my favorite store in Ouray [CO.] run by a mother & daughter from TX. They have the cutest things, there is something for everyone, always something new & there's always something for me, LOL!

This time I fell for this great purse- it has the right amount of bling, lots of pockets, perfect handle & the size is just right too. Wow, I think I hit the jackpot!

It isn't real cowhide, but woohoo, I am stylin'!

Friday, August 28, 2009

"Back In The Saddle" [so to speak!]

I have been absent from the blog scene a week, I was in CO. & busy with a house guest etc. I think that I did manage to infect her with the dreaded & incurable Quilt Pox- she fell for the NYB. PP. blocks & using some of my CW replica fabric scraps, made two & I sent her home with fabric for two more-LOL, will her husband ever allow her within my sphere of influence again!?
Aren't they pretty & didn't she do a great job & for a first attempt too?


I have completed another project.
I call this quilt "Provence" because it reminds me of that region of France. I got the top from Linda Rotz Miller prolific & talented quilter-I actually won it in a drawing! She has a plethora of tops to choose from all very reasonably priced.


I quilted it with a freehand Baptist Fan design that I like very much especially for busy quilts that won't really show the quilting. doesn't the red binding set it off perfectly? Thanks Linda I love this quilt & it may be difficult to part with whenever it finds a new home!
I notice that there are a few threads on the back, it's hard to catch them all. Quilters always have threads hanging around it seems!

The solid backing in a soft yellow shows off the design nicely & compliments the colors of the top.


Here is the Rainforrest quilt, finally bound! It's small so it would make a good table topper or maybe a wall hanging.
I managed to cut out the fabric & piece a baby girl D9P last week while visiting with my friend- it's a really sweet quilt so I will get it on my LA tomorrow because the baby is due any day now I think. I sort of blew off today, recovering from the 9 hour road trip from CO. to AZ yesterday & the shock to my system of the transition from 55 degrees to 113! Yikes it is hot here!

Thursday, August 20, 2009

Quilty Give-Away

If you love all things quilty as I do you will want to check out Regena's blog at http://quiltfever3.blogspot.com/. You will be amazed at the selection of gifts she has for one lucky person! A quilt plus so much more.

VTT

I'm a bit behind this week, drove to the mountain house Tuesday with a friend, went to Huggy Bunch Quilting Wednesday & now I'm a bit weary.
But I do love VTT & I check out Colorado Lady's blog to see what all the others have to show. So won't you join us? I know you must have one or two vintage pieces around the house!
Due to the lateness of the hour[after 3 a.m. mountain time] I have chosen a couple of quick items to show.
First is another of my working vintage machines-I have no idea of it's age, but I bought this Riccar ofrom eBay, for $26, a steal, it's a sweet little machine but the case is missing & the base is a bit worn.
No matter, no one else seemed to want it either so I bought it at the last moment. I need to scout eBay for a replacement case.

Here's another old timer that appeared to be a homeless orphan on eBay, I always feel sorry for them when I see that they aren't wanted!
This old top is rather fragile, maybe it's feed sacks, hand pieced, a few seams were rather poor & needed a bit of TLC before I quilted it. I think it was $10-15. I used a muslin on the back & a very basic meandering quilting design so I could wander where ever I need to stabilize the weak seams .
It's sweet & cuddly & I have no notion of it's destination-yet!
Now if I have peaked your interest in all things vintage visit Coloradolady & check out the wide assortment of VTT blogger's offerings.

Friday, August 14, 2009

Scrap Post-a little of this and a little of that!

Someone on one of my lists asked where were the pics of the baby-I haven't posted any for a couple of weeks I guess! We had him here on Monday-JW's first full day at Med. school- & I took a few new pics. He had his first shots that day but he was good as gold, no fever or fussing.

Gorgeous boy! So huggable & kissable!

I was forced to go to Quiltz this week, I needed binding for the Future's So Bright quilt & while there I tried very hard to resist but succumbed to an additional fabric purchase! They have a new line called "Harmonies" that I found irresistible- apparently I am not the only one because it's a brand new line & several of the bolts are almost gone.
The photo doesn't do it justice it's beautiful & I bought enough for a full length apron with the brown & pink spot for ruffle & trim. I am going to make one of the retro aprons from Cindy Taylor Oates "More Retro Aprons" book. I bought the fabric with my 25% off coupon.


I promised pics. of my new quilt hanging/storage system. it's out in the loft by my longarm machine.

You can see that I still have one empty rod & I have a few more quilts to hang but first I need to bind them, I only want to hang completed quilts here. I have 12 up so far & the system is working as well as I hoped, DH did a great job of carrying out my design!


The wall grid is a similar system to those used in many retail stores, strong & very efficient, takes up little space, I can still see them & if need be they are easily moved. I can also drape a sheet over the whole thing to protect the quilts from dust & fading.
I love getting organized- next I have to find a way to store my collection of LA books, DVD's & reference materials- not showing that, it's just too messy!

Wednesday, August 12, 2009

Vintage Thingies Thursday

Well I'm not sure what happened to my week, hope yours hasn't whizzed by as fast as mine!
VTT is here again so slip on over to coloradolady's blog & see who else found some sweet old things to display.
I have one prized possession to show today my green [the company calls it light turquoise or something!] Singer Featherweight 221, manufactured in Clydebank Scotland, I believe.
I had coveted a FW for years & casually scouted eBay & talked to my friend about it,


I knew she had one, didn't realize that she had two!
Leslie's Mom was a prolific quilter, into her 90's [I never ever saw a house stacked with so many completed quilts] & she owned not just one but two FW's. After her Mom died Leslie decided to keep one FW & had thought to list the other on eBay but wanted me to LA a few quilts for her so we did some trading & I ended up with this little beauty for my very own! I think that I got the better end of the deal.

Because it belonged to Leslie's Mom, it was beautifully maintained & sews like a dream. I'm not crazy about the foot pedal so I am looking into a different one.
About 6 years ago when I was teaching GS #1 to sew on my electronic machine he kept complaining that it was making the wrong stitch-turns out he's a boy, he was playing with all the bells & whistles- so I pulled out the little FW & he had no more strange stitches because there are none, just a perfect straight stitch. Here's the patriotic quilt he made with the FW- he sort of thinks the machine is his now!
For years I said this machine was white & a friend said "no they are green" & lo & behold she was right, it is very pale green when you see it against white. Very funny huh, I'm a quilter & I promise you I'm not even close to color blind though I do have two color blind sons!


The original carrying case is also in A1 condition, it's definitely green, lol, & I have the books & a few tools too, though I think that silver tube of grease has seen better days-at least I think it's grease?

I love the fact that I have provenance on this machine, that it was used by a great quilter, the mother of a good friend, & it is all the more special for that.
That's all for this week now hurry on over & check out Colorado lady & the rest of the VTT gang!

Tuesday, August 11, 2009

NYB, She's Done!

Here it is- I am so delighted I am practically doing the "happy dance". This major project has been hanging over my head way too long so the finish is cause for rejoicing.

I love "finished" projects, don't you? But I also enjoy the process! Does that make me task or goal oriented?
No matter, right now I am enjoying the glow of attaining a [long overdue] goal.
I will load up a few pics of the quilt, well more than just a few because I am really celebrating, maybe even good for an adult beverage,LOL.
This is my second NYB quilt, the other is a KS made for son Matthew in 2005 from a planned colorway and it looks very different.
I decided to leave two opposing corners curved, I just liked the artistic appeal, even though I knew that it would require the construction of yards of double fold bias binding.
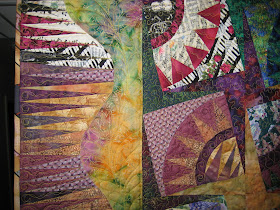
Each individual block is a mini quilt, a unique arrangement and combination of fabrics and design, no two the same. Almost all of these fabrics came from my "stash" my personal collection of fabrics. In addition I did purchase a couple of the batiks that I used to frame the blocks.

The piecing of the quilt took a good while, can't remember how long, but the entire thing is paper pieced and then of course the papers have to be removed after construction, a tiresome task.
If you look closely you will see that I also coordinated the border fabrics with each of the adjoining block fabrics. That took some planning, I never imagined how I would put all that advanced math to work!
Making up the fabric combos for each block was the most fun! There's a musical theme, African themes, Monet themes, Oriental themes and so on. Thirty different blocks in all. Who would ever have imagined that all of those very different fabrics would work so well together.
Arthritis and the time required are the reasons I seldom hand stitch quilt bindings any more, but this quilt called for that kind of sacrifice.
If you have ever paid to have a quilt finished by hand you will know whereof I speak. Most professionals charge around .28cents/linear inch to attach a binding to the front and hand secure it on the back. When I tell you that the hand work on this quilt binding alone took me more than six hours, after I made the double fold bias binding and attached it to the front of the quilt, you will understand the .28c/inch! The circumference is 345" which translates to $96.60 just for binding this quilt!

That said, most quilters will never get rich [I never knew a rich one anyway] it is simply not feasible to charge for the labor entailed. I can't begin to estimate the total time invested in this one quilt-the machine quilting alone took me several days, you can see that each block is custom quilted according to the theme of the fabrics, and as previously stated I have no clue how mucht time I invested in the piecing.
Our main reward is the joy of the creative process.

I used Superior King Tut variegated gold thread [Kailua] on the top and a gold Bottom Line thread in the bobbin so that the stitching would not distract from the pretty backing fabric.

This is the Japanese themed backing fabric- I was very pleased to find this and on sale, it coordinates both color and theme-wise with the front, the blocks look sort of like fans.
Anyway, I do love this quilt and I may have to keep it- unless of course, someone were to offer me a great deal of money for it lol, almost everything has a price you know!

Monday, August 10, 2009

New York Beauty Quilt Progress

My UFO NYB top [about 8 yrs. old] is finally and in the process of binding. I am so pleased to get this far with it and hope to finish the hand stitching today while we are watching darling baby Matthew [who had his first immunizations today so he may not be a very happy little fellow.]
I had to make bias binding for the NYB because two of the corners are rounded-the original design called for one rounded corner & all these years later I'm not sure now why I went to all the trouble of designing a second one!
Last time I made bias binding for a quilt I miscalculated the square root [explanation later in the post] I think, because I ended up with at least twice what I neededand therefore I have yards of it left over, see?

This time I decided to try something differentand did a rough mental calculation rounded up, I figured hey I know how to do this!
I was a little wary when I looked at the resulting binding that I might be short but decided to sew it on anyway. Things went swimmingly until I reached the final corner when aarrrrrgggghh, I realized that my suspicions were well founded..................
I don't have quite enough,

I'm short about 18". Drat!

Not willing to allow any opportunity to pass me by I decided this would be a good time to illustrate briefly the art of constructing double fold bias binding. This too is "old hat" for experienced sewers but not so probably for newbies and non-quilters.
I need a square of fabric to begin and to calculate the size of that square I take the length needed-18"- & multiply by the width in this case 2.5"[the folded bias binding will be 1.25"]. I come up with 45. I need to find the square root of this number in order to get the size of my fabric square, so I rounded up the sq.root at 7 and then decided on a 9" square just to be really sure I have enough!

Here is my 9" square.
Divide the square cornerwise like so......
re-arrange.........


and sew the triangles back together to make a rhomboid parrallelogram!


Because I only needed a small amount I then cut the fabric into two 2.5" wide strips & simply sewed the two pieces together to get my 18".

For a longer amount I would sew the parrallelogram into a tube and then cut a continuous strip.
But back to the current project.........

I pressed my new 18" piece in half along the length......

Whew, perfect, I made just the right amount- I will only have about 6" left over!

I sewed it to the piece already attached to the quiltand finished attaching the binding to the front of the quilt. See, no need to panic, it's fixable!
Clear as mud??
Don't despair, there are some excellent tutorials on the web, if you ever really need this very important skill just Google "making bias binding"!
However I am not very trusting any longer of this method of calculating the yardage I will be suspicious in future, will I get yards too many or inches too little! There are limited uses that I know of for left over bias binding.
Now I have just one more step, to stitch the binding down by hand to the back of the quilt with tiny nearly invisible stitches.
Oh & a handy little trick for securing the binding during final stitching whether by hand or machine, these hair clips work really well instead of pins.
You can pay megabucks at the QS or pick them up at the dollar store. They are hair clips after all, no expensive rocket science required!

Wednesday, August 5, 2009

VTT

Last week I missed Vintage Thingies Thursday, we got in from CO. Wednesday & the nine hour drive leaves me a little weary so Thursday I was trying to catch up with myself!
I have a couple of rescued items to show this week, then you can check out all the other vintage aficiandos at coloradolady.

The first is a small bureau that I discovered outside in the yard of the first house where we lived in VA. after we were married. I may not have paid much attention to it but I happened to see the back & could tell it was oak, the remainder of the surfaces were covered in many & various colored coats of paint! DH indicated that it had come from his mom's house in MA. but there the information ran out! It had some old pots & pans in it, not worth rescuing, but I could see the bureau was sturdy so I stripped & sanded & sealed it & replaced the hardware & it has been in use in our home ever since. Simple, bare of any special adornments, it's a treasure to me! I have no idea of it's age but it is well made & sturdy, dove tail carpentry rather than nails & screws & I would guess the first quarter of the 1900's?
The second item was also rescued- while we lived in Germany in the 70's we used to go "junking", picking up others discarded items from the sidewalk during the quarterly "un-contained" trash pick ups! We searched our surrounding villages for their assigned dates & then drove around at night looking for treasures-we never came home empty-handed & sometimes we found such jewels!
This little cabinet is one such "jewel', it looks like what we would call a bedside table. I guess it could have been a commode cabinet..........

It was in fairly good shape except that the top had a split that needed fixing where the wood had bowed. I sanded the finish lightly to clean it up & show off the grain & sealed it.

It too is dovetail construction and again simply bare of any but the necessities including wooden handles. It has one long hinge rather than a couple of shorter ones on the door, unusual in my experience.

It makes a handy little storage cabinet in the guest powder room for towels & TP etc & the linen scarf with the crochet edge is also a vintage find.
Don't you just love giving new life & purpose to old cast-offs?

Tuesday, August 4, 2009

The Storage Dilemma

Where to put "stuff", it is always an issue!
I am always looking for better storage solutions & often DH is called in to assist with some sort of construction task. Recently I purchased supplies to make some shelving in my studio, & in the loft by my longarm machine a place to hang some of the quilts that are scattered around this house......


here.....

there....


and....


everywhere!

This is the system I will use to hang at least some of these quilts after I purchase appropriate rods tomorrow.
This sort of system is used by many stores for display & it is relatively cheap & easy to install
I don't have a picture of my work table before but here it is after DH installed the wall grid so I could get all my tools & other stuff up off my work space. It was also an opportunity to cull unused items & reduce the total mass!
I am very pleased with this you might almost say that I am excited about having a cleared area for cutting fabric & trimming quilts etc & although it might not seem like a big deal for me it is!


The flat surface is all clear & underneath behind the curtain is more storage!
Below is a quick pictorial tour of the rest of the studio, it is really quite a small room so everything has to serve multiple purposes like this bureau with the pressing pad I made to fit on top of it.


My wonderful Tracey Table, that is the best investment I have made in sewing efficiency & convenience.


I converted the closet with three inexpensive bookshelf units [Ikea & Lowes] it's a bit untidy at the moment I have been digging around in it! I cut up a clear vinyl shower curtain & hung it flush with the front of the shelves to keep out the dust.

Those are my UFO, PIGS & WHIMMS in the clear plastic boxes, they are decreasing in number as I have completed 14 UFO's so far in 2009! Only six more to go.


Then I made a pretty curtain to keep out the light & reduce fading.
Last is this open shelf stacked with mostly quilt books, magazines, patterns & some bric a brac!
It could use some tidying also!
Now lest you assume this is it, I haven't shown all the LA quilting supplies etc in the loft-or the machines, fabric, quilts & supplies that are at the CO. house! All that for another day.